The last day of actual class at La Junta High School, and we did probably one of the most educational labs I have ever done. In order to effectively understand Acids and Bases before the year ended, five of us, with the help of Mr. Ludwig, completed the Acid-Base Titration Lab.
Each solution is either determined as an acid or a base depending on it's pH level. If a solution has a pH level of 0-7 it's an acid. If it has a pH level of 7-14 it's a base. If the pH level remains at 7, it's neutral. An example of this would be water. There is a turning point in which the acid turns immediately to a base, and visa versa.
Looking at the difference between acids and bases:
Acids Neutral Base
low pH water high pH
bad? good?
H+ OH-
The determining factor between acids and bases is not only dependent on the pH level but also on the amount of hydrogen and hydroxide in the solution. If there is more hydrogen in the solution the solution is an acid, whereas if there is more hydroxide it is a base.
The Experiment:
Our goal for this experiment was to get our solution to the turning point(equivalency point) where it turns from an acid to a base. We were attempting to graph this point on LoggerPro.
Steps:
1. We placed 10 mL of the HCL solution into the beaker along with 50 mL of water.
2. We placed a stirrer in the beaker and placed it on the magnetic stirrer so that it could stir the entire duration of the experiment.
3. We suspended a pH sensor that was connected to LoggerPro into the water in order to track our results. Also, in order to track the pH levels, Mr. Ludwig dropped in a few drops of pH indicator. We did this so that when the acid turned into a base, we would be able to tell immediately because the indicator would scream pink.
4. Using a 50mL buret filled with 0.1 M NaOH, we careful placed the NaOH solution into the distilled water and HCL solution, tracking the amount and pH level every 2 mL.
(because NaOH is a base and HCL is an acid, the solution in the beaker began as an acid. As we slowly poured NaOH into the solution, it was changing into a base.)
Once the solution turned pink, we knew it was fully transformed into a base.
Graph:
As determined by the graph, our experiment went very well as we did accomplish the "S graph" look. As the points on the graph climb, the acid slowly begins turning into a base as the pH level rises. The few dots on the graph that rise so abruptly are the equivalency points where the acid turns into a base, then slowly levels out as a base.
Through the graph and data we collected we were able to determine the concentration of NaOH in the beginning, an the volume of NaOH moles of NaOH, Moles of HCl, and the Concentration of HCL all at the equivalency point.
Concentration of NaOH at beginning: 0.1 M
Volume of NaOH at equivalency point: 15.51 mL or .01551 L
Moles of NaOH at equivalency point: .001551 mol
Moles of HCl at equivalency point: .001551 mol (the moles of NaOH and the moles of HCl must be equal at the equivalency point.)
Concentration of HCl at equivalency point: .1551 mol/L (to calculate this, we divided the moles of HCl by .01)
In this lab I learned how easy it is for an acid to turn into a base, especially in this case. It only took a drop for the acid to turn pink(into a base). It was a lot of fun working as a class for this last lab. Each of us had a job to do and in this way we accomplished the lab to Mr. Ludwig's expectations. Success!! (:
Friday, May 4, 2012
Crystal Lab
With the extremely busy schedule everyone has had lately, it was no surprise that I missed almost all of the formation of my crystal. I was however involved in all of the process, but lacked many pictures, except the final result.
Here are the steps for the lab:
1. obtain distilled water and put it in a beaker.
2. we put the aluminum potassium sulfate in the distilled water and mixed until it was supersaturated.
3. When there were little crystals still in the bottom of the beaker after it is completely saturated, we put the beaker on the hotplate and repeated the process. The hotter the water is the more it is able to absorb so the aluminum potassium sulfate.
4. we kept adding aluminum potassium sulfate until the heated mixture was supersaturated as well.
5. we left the mixture to cool overnight.
We returned the next day to find that there were crystal seeds all over the beaker.
We then took the seed crystal and tied it to a string, then repeated the supersaturated process.
The next day that I actually returned to this class, my crystal was pretty big and my beaker was full of tiny crystals just hanging out at the bottom.
I learned a lot about how crystals can be formed by supersaturating the distilled water. I also learned that creating crystals takes a lot of time and patience as they have to sit and cool. It's interesting to see how quickly the crystals grew overnight though, as they started out with a seed crystal about this size:
They turned into multiple crystals about this size:
This is probably one of the coolest labs I have done in chemistry. Even though it was easy and time consuming, it had a cool result that all of us got to take home with us. I definitely feel like I learned some valuable information through this lab.
Wednesday, April 18, 2012
ChemTech Project
For my ChemTech project I am going to research the topic of 3D printers. This concept is fairly new and and interesting to the American public.
My Question is: How are 3D objects created from this wonderful, magnificent printer?
Prezi:
http://prezi.com/n4uy8koscrzu/3-d-printing/
Article:http://www.sciencedaily.com/releases/2012/03/120312101918.htm
My resources:
http://en.wikipedia.org/wiki/3D_printing
http://www.objet.com/
http://www.chemistrydaily.com/chemistry/3D_printer
http://hackaday.com/2010/07/15/3d-printing-with-chemicals/
http://www.3dfuture.com.au/articles/11-reasons-why-schools-need-3d-printers/
http://eater.com/archives/2010/12/29/3d-food-printer-futuristically-prints-chocolate-cookies.php#d-food-printer-6
Monday, March 5, 2012
Evaporation and Intermolecular Attractions
Procedure:
1. We wrapped probe 1 and probe 2 with filter paper and attached them with rubber bands.
2. For the first round we put probe 1 in the methanol and probe 2 in the ethanol for over 15 seconds so the liquid could soak through the filter paper.
3. We then took the probes out of the containers and attached them to the end of the table with masking tape, making sure they didn't touch.
4. We allowed the liquids to sit on the edge of the table, while monitoring the temperature. We took apart the probes after the temperature became consistent.
5. We took the higher temperature and subtracted the lowest temperature to get the change in temp.
6. We then predicted the change in temperature for the next few chemicals and repeated the steps for heptane and hexane, and propanol and butanol.
Materials:
Mac computer rubber bands masking tape
ULI methanol
Data Logger ethanol
Temperature probes propanol
filter paper hexane
Here are our results:
Heptane and Hexane Lab
As shown in the graph above, during the heptane and hexane section of this lab, it was determined that although at the beginning the temperatures were very similar, as the time progressed, it was obvious that the heptane had a much higher temperature than the hexane did. This was a difference of almost 10 degrees celsius at 174 seconds.
Methanol and Ethanol
In the methanol and ethanol section of this lab, the results looked a lot lke the heptane and hexane lab with few differences. The temperatures started out very similar to each other but as the chemicals evaporated, it was obvious that the ethanol had a much higher temperature than the methanol. This difference was almost 7 degrees celsius.
Propanol and Butanol
The propanol and butanol section was the most diverse of the rest of the lab. There might have been a mistake in the lab procedure as the temperature of the propanol spiked and then immediately decreased. But, as time went on, the temperatures steadied and it was obvious that the butanol had a slightly higher temperature than the propanol. This difference was meerly 5 degrees at 254 seconds.
Monday, February 20, 2012
Monday, February 6, 2012
Unknown/Mole Lab
Mole Lab!
Tenchita, Timmy, Serena and I had a lot of fun in this lab just because we felt like really scientists. We were told to figure out the atomic mass given only the number of moles. We weighed each cup to find out the grams and then took the number of grams divided by the number of moles to get the atomic mass. Given the atomic mass we find out what the element was.
Avogrado's number - (6.0221367 x 10^23).
Data
Sample. Number of moles. Grams. Atomic mass. Element
A. .163 6.53 40.061 Ca
B. .910 24.51 26.934 Al
C. .160 9.44 59 CO
D. .258 53.90 208.9 Bi
E. .220 14.26 64.81 Zn
F. .756 49.26 65.158 Zn
G. .492 28.66 58.25 Ni
H. .430 89.16 207.349 Pb
I. .381 21.28 55.85 Fe
J. .259 30.70 118.53 Sn
Wednesday, January 25, 2012
Hydrate Lab
Although I wasn't here for the lab Timmy, Serena, and Tenchita are nice enough to let me use their data to do a write up about this experiment. They chose to do the experiment involving epsom salt. They put the epsom salt in a test tube and weighed it before any other experimentation. The weight before heating the salt was 4.07 grams. They then heated the salt (telling me that Kandace almost killed them a couple times with matches and the gas). While heating the tablets turned white which they then let cool. After letting the flaming salt cool they weighed it after, noting that it weighed 3.66 grams. They then added water, learning that the crystals turned back to blue.
By subtracting the weight after heating from the weight before heating, we discovered that the crystal only had about 10% water. This is different from the expected percentage because of crystals that got stuck in the tube and crystals that were still blue.
The formula for the crystals is CuSO4 5H20. After multiplying the total CuSO4 mass by 5 parts water, I learned that the total water mass is 90 grams while the total mass was 249.6 grams. After dividing the 90 grams by the 249.6 grams, we discovered that the expected mass was 36%.
Sunday, January 22, 2012
Calculations
Moles!
No not the animals, more like the number of moles in an element how the amount of moles needed for a compound.
One mole equals 6.02x10^23 atoms.
So, how do you find how many grams per mole an element has? For example, the element Bromine has a mass of approximately 79.9 so it is 79.9 grams/mol. Now, looking at a compound such as K2O. Potassium has a mass of 39.098 and Oxygen has a mass of 15.9994. Since there are two potassium atoms, we have to multiply the 39.098 by 2 and then add the 15.9994. The final answer is 94.196 K2O. This means there are two potassium atoms for every one oxygen atom, but I'll get into that a little bit later.
Looking at a more complex compound such as C14H18N2O5, it's easier to find the measurement of moles in the compound. First you must calculate the grams per mole, which turns out to be 294. Then you take the mass of the smallest element, which is 225 grams. Divide the 225 by the 294 to get the answer. C14H18N2O5 is .765 of a mole.
Percent of Composition
Let's find the percent of composition of Carbon in an artificial sweetener. The compound is C5H8NO4. To get the percent of composition one has to divide the mass of the total Carbon by the total weight of the compound. Carbon has a 12.0107 mass, but there are 5 atoms of Carbon, so the total mass is 60.055. The total weight of the sweetener is 146.1212. 60.055/146.1212 is approximately 41%. So, Carbon is 41% of the artificial sweetener compound.
The Empirical Formula
The Empirical Formula helps a scientist (or student) determine the compound that is put in front of them based on the given weights. For example, when 2.34 grams of Nitrogen and 5.34 grams of Oxygen are put in front of you, by dividing by the weight we find out that there are .167 moles of Nitrogen and .333 moles of Oxygen. Take the .167 and divide it by .167(the least amount of moles) and do the same for .333 which rounds out to 1 to 2. So, the ratio is one to two. But, that could mean that the compound is NO2 or N2O4. The fact that the compound weighed 93grams was given. Through multiplication, it is found that the compound is N2O4 (Dinitrogren Tetroxide)
Saturday, December 3, 2011
Compound Names and Formulas
Naming Compounds is fairly easy when Mr. Ludwig gives you a handy dandy chart to look off of. Basically, all you have to do is find the formula and match it with the name.
For example:
NaF
Na= Sodium
F=Flourine
So the compound name is Sodium Flouride. (ions end in -ide)
Things can soon get more complicated like with the compound
Mn(NO3)3
The outside 3, goes to the top of the Mn, so it's Mn3. Mn3 = Manganese(II)
The only formula left is NO3 which is Phophate.
This equation is Manganese(II) Phosphate.
Now, when turning names into formulas the same rule applies: LOOK AT THE CHART!
The name potassium flouride is easily turned into KF after looking at the chart, but the names can get more difficult. When looking at Ammonium Sulfate, we see that they charge of the ions don't equal. Ammonium is NH4+, while sulfate is SO4^2. The positive 2 charge is moved over to the ammonium in order for the equations to equal out. This turns the equation into (NH4)2SO4.
These basic principles continue to apply as we went through the 24 problems on the paper.
Why is Gold our Currency?
While listening to the podcast and looking at the periodic table I realized there are numerous reasons why Gold is our currency and why other elements on the table would not work.
Hydrogen, and Helium through Rn would leak away because they are a gas.
Lithium wouldn't work because it is very flammable, so flammable in fact that it has the possibility to burn through concrete.
A lot of other elements on the table are reactive, meaning they can combine with other elements or corrode.
The actinides wouldn't work because they are extremely radioactive.
Silicon(a key ingredient in sand) is too light and way too common, as well as copper.
Osmium on the other hand is found in meteorites, meaning they are way too rare.
Silver has a different issue. It tarnishes easily. Once the silver tarnishes you can wipe away the tarnish but that is also wiping away part of the silver at the same time, therefore losing some of it's value.
Paladium and Rodium didn't appear til after our currency was created, meaning they couldn't be suggested as our currency.
Platinum has an extremely high melting point, making it too difficult to mold into the shapes of coins or other shapes. Also, platinum looks like numerous other metals, meaning the currency could be easily replicated.
So, this means gold is our only choice. It never corrodes, it's solid, it wont kill you because it's not radioactive, it's rare but not too rare, it's easy to melt, it's obtainable, and most of all it's testable. There is a simple test involving a pumice, a black stone, and a little bit of acid. The smudge left determines the purity of the gold, but does not ruin the metal. This test dates back to Ancient Greece.
Overall I think Gold was the smart choice for our currency.
(Here is the podcast that I used as the basis of this blog, borrowed from Mr. Ludwig who got it from npr)
Magnesium Lab
Procedure:
1. collect 25cm of clean magnesium strips, a ceramic crucible, a bunson burner, and a "tree"
2. Weigh the empty crucible, weigh the crucible and mg strip
3. subtract the two weights to find the measurement of the mg strip before heating.
4. place the crucible and strip on the tree, directly above the lit bunson burner
5. a white smoke/flame will soon appear. at this point turn off the burner and let the crucible cool for quite some time
6. after it has cooled completely you will notice the mg strip has turned into a white powdery substance. weigh the crucible and product at this point.
7. to find the weight of the magnesium products after heating, take the after heating measurement and subtract it from the weight of the empty crucible.
8. clean up and you'll be done!
Data:
Material Mass(g)
empty crucible 58.7
crucible&Mg ribbon 59.6
(before heating)
Magnesium ribbon .9
Crucible&Magnesium 60.1
(after heating)
Magnesium Products 1.4
Conductivity Level: LOW LIGHT
Analysis:
With this lab I learned that the magnesium products actually weigh more after the heating process than it did before the heating process. This was a .5 gram difference in my case. I also learned that magnesium is easily ignitable and lets off a different type of smoke than a regular fire would. With the help of Zach and Dakota, I also learned that ceramic crucibles are extremely breakable when heated intensely. (:
Wednesday, November 9, 2011
Conductivity Lab
Today, we did a conductivity lab, involving many different solutions including the ones listed above. We learned that when there are more ions in a solution, the conductivity level increased. For example, the number of ions in lactase hydrate + distilled water were either very scarce or absolutely nonexistent. But, on the other hand, the number of ions in the calcium sulphate and potassium chloride were extremely high, causing the intensity of the conductivity to increase. On the other hand, solutions such as the corn starch and the calcium sulphate were medium intensity, meaning there was an average number of ions in those solutions.
Friday, November 4, 2011
Periodic Table Scavenger Hunt
https://docs.google.com/document/d/1dhjzzczwpE_r4hUpc1I6tfbVvaSRS65nkE-dB1UJLh4/edit
This is my Scavenger Hunt from a few days ago. :D
Thursday, October 20, 2011
Neutrino Rocking Scientific World
http://www.nytimes.com/2011/09/23/science/23speed.html
Apparently, new advances in technology has allowed a particle called a neutrino to go faster than the speed of light.(Nuetrinos are "odd slivers of an atom that have confounded physicists for about 80 years." This little particle has no mass.) The cosmic speed limit was once considered to be 186,282 miles per second, but the neutrino has rocked that limit. Some physicists are skeptical, wanting to do their own testing for more verfiable conclusions. This new discover has not only shooken the physicist world, but also broken one of Einstein's theories of relativity. (E=mc^2) Many scientists are saying that this new discovery could cause a lot of problems in the scientific world, forcing them to reevaluate many of their previous findings.
There is so much skepticism with this new finding that people are demanding to have other physicists attempt to redo the experiment, wondering if they'll come up with the same results. The physicists in Geneva are welcoming the attention to their hard work.
Many people, including Drew Baden, chairmen of the U of Maryland physics department, claim the findings are a result of measurement errors, as tracking neutrinos is very difficult.
Proving their findings correct could possible change the idea of how the universe is put together, according to Greene, but he highly doubts their research will hold up to the extreme scrutiny.
This is an edited picture of a neutrino found on google.
This article was particularly interesting to me because, while growing up, I was always told that E=mc^2 was the theory of relativity and nothing can surpass it. This new discovery is very monumental if found to be true. It seems that if it is found to be true, this theory along with a lot of other scientific ideas coudl be greatly altered and have both negative and positive effects on science. I thought the neutrino was interesting because it's stumping scientists. In school, we are commonly told "This is that way because..." but the neutrino acts a certain way and no one knows why. The fact that they can change "flavors" is really interesting and I hope to find out more about it in the future. Also, knowing that so many scientists are doubting this new discovery is sort of interesting because, they have believed one thing for so many years, and now this new discovery could ruin all of that. Although many people doubt this information to be true, it would be interesting to see how certain scientists react if it's found true. Like the article said, it could shake the scientific world.
Through further research I have found....
Neutrinos do not carry any positive or negative charges. They are completely neutral. Wikipedia says: "Neutrinos are affected only by the weak sub-atomic force, of much shorter range than electromagnetism, and are therefore able to travel great distances through matter without being affected by it." They have a weak reaction to almost everything but are affected by gravity. Neutrinos are a result of radioactive decay and nuclear reactions. Many of these reactions are common in the Sun. The three flavors of neutrinos, mentioned above, are:electron neutrinos, muon neutrinos and tau neutrinos.
Tuesday, October 11, 2011
Quantum Mechanics and Split Peas (Electrons and Energy)
While keeping Bohr's ideas in mind, we did a lab to bring more details to Bohr's theories. We took a cup full of split peas and put them in a funnel hovering over a target. We were then to release the peas onto the target and count how many landed in each area that was numbered by the lab sheet. Serena, Kandace, and I did two different runs.
For the first run we put the funnel as high up as we could, therefore increasing the energy. Because the energy was increased so much most of the peas landed in outer areas rather than the inner areas. Our data was:
As you can see not very many peas landed towards the center of the target. Because of the higher level of energy from raising the funnel, most of the peas were forced to outer areas. This is true about electrons too. The higher the level of energy, the more spread out the electron is forced to become.
The second run we did, we lowered the funnel, decreasing the energy and allowing the peas to land more near the center. This data was:
As you can see, when we lowered the funnel, lowering the energy level, the peas were more centered and gathered around the main portion of the target. Electrons that have a lower energy are less spread out than electrons with higher energy.
I learned a lot through this lab. First of all those little plastic split peas really make your hands stink. Secondly, the higher the energy level, the more spread out the electrons, as described by the quantum mechanical model of the atom. The lower the energy level, the closer together and more centered the electrons are.
Friday, September 30, 2011
Light Spectrum Lab
Over the past two days we have used Spectroscopes in order to look at different lights and gases. We've looked at everything from a regular lightbulb to helium gases. We weren't just looking at the lights but particularly the spectrum that the lights gave off through the spectroscopes.
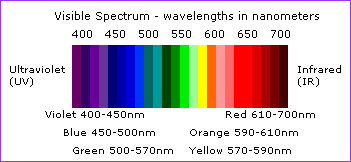
We began this process by looking at a regular lightbulb, in an attempt to see RoyGBiv! (Red, Orange, Yellow, Green, Blue, Indigo, Violet).
Looking at a regular light, the spectrum consists of all of the colors and it's continuous(there are no gaps in between the colors.)
Then we look at the bulb with a blue liquid in front of it, which showed this type of spectrum. Although it's difficult to see, some colors are missing from this spectrum because of the blue liquid.
After we looked through the blue liquid we looked at the bulb through a red liquid. The red liquid also caused some of the colors to become missing, breaking the continuousness of the spectrum.
Then we looked at both put together! This caused the spectrum to look much different than the regular lightbulb because of the different changes in colors.
We continued looking through the spectroscopes at neon, helium hydrogen, iodine, and a couple of other elements, though I didn't get all of the pictures from them.
The neon looked like this. As you can tell the spectrum is not continuous.
The helium looked like this. This spectrum is not continuous as well. But you can see red, a tiny mix of either yellow or orange, green, and blue.
The iodine looked like this. This spectrum is definitely not continuous. The colors that are missing are parts of yellow, indigo, and violet. But you can see red, orange, parts of yellow, green, and blue very clearly.
The hydrogen looked like this. This spectrum is not continuous. But you can see blue, been, a little spec of yellow, and red.
When looking at RoyGBiv, we look at the energy levels of each color. The highest energy/frequency level is the Violet, while the least is the Red. You only see these colors when they are going from the "excited" state to the "ground" state. This lab taught me a lot about how the different elements give off the different lights. It also taught me how the colored liquid sitting in front of the light can cause the light spectrum to change drastically due to the colors that are absorbed. Light is a lot more than the sun tanning your skin during the summer, it has a lot more minute details and information that it's trying to show.
Tuesday, September 20, 2011
Wednesday, September 7, 2011
Separation Lab w/ Colors!!
So we did another separation lab and this one was way cooler!!! We decorated amazing water filter paper. Then we poked a hole in the middle and stuck a paper towel through the hole. The paper towel acted as a post to keep the whole piece of filter paper from falling in the water. Then we put the paper towel in the water and let science do the work!
Without even realizing it we used chromatography to separate the colors. Other examples of separation are filtration: when you use a filter to separate the mixture.
This works great with different sizes of hard particles.
Distillation is used for separating mixtures based on differences in the conditions required to change the phase of the components of the mixture. To separate a liquid mixture, the liquid could be heated to force the components with different boiling points, into the gas phase. The gas can then be condensed back into its liquid form and collected.
Double Distillation is when you repeat the process on the collected liquid to improve the purity of that particular product. You can do the reverse process to liquefy components changing a liquid's temperature and/or pressure.
Centrifugation is when they take the tubes and put them in the centrifuge, which viciously spins them, causing the components to separate due to the force of the spinning motion.
We waited...
And Waited...
And waited some more...
and finally!!!
The chromatograph was pretty much all the way done.
Without even realizing it we used chromatography to separate the colors. Other examples of separation are filtration: when you use a filter to separate the mixture.
This works great with different sizes of hard particles.
Distillation is used for separating mixtures based on differences in the conditions required to change the phase of the components of the mixture. To separate a liquid mixture, the liquid could be heated to force the components with different boiling points, into the gas phase. The gas can then be condensed back into its liquid form and collected.
Double Distillation is when you repeat the process on the collected liquid to improve the purity of that particular product. You can do the reverse process to liquefy components changing a liquid's temperature and/or pressure.
Centrifugation is when they take the tubes and put them in the centrifuge, which viciously spins them, causing the components to separate due to the force of the spinning motion.
Subscribe to:
Posts (Atom)
.jpg)